Welcome

This site records the creation of an Archtop Guitar from concept to completion.
I've sought to share what I hoped to achieve and the challenges involved from the perspective of a "motivated first time builder".
I hope it is helpful ...
Context; A bit about me!
I am a first time guitar builder.
I have a particular interest in Archtop Guitars and am fortunate to own "several"! :-)
I recently (2022) had a truly exceptional guitar made for me by a local luthier (Fibonacci Guitars), which incorporated many elements of a design that had been knocking about in my head for some time.
I was inspired to try to create something myself and enjoyed the support, guidance and encouragement of several people in the process.
I thank and acknowledge them in the "Credits" section later on ....
How Feasible is a DIY Archtop Build ?
The good news is that few or no "professional" tools are required!
I found that much of the work - and the most satisfying required only hand tools such as :-
-
planes - including some tiny ones!
-
rasps and files
-
chisels and gouges
-
sanding sticks and sandpaper (lots of it!)
Everyday power tools used :-
-
pillar drill
-
hand sander
-
jig-saw
Specialist power tools were mainly:-
-
Bending Irons (for the sides - or "ribs")
-
Band saw - but not essential, or without drawbacks!
Of course, not everybody is fortunate enough to have dedicate workspace with benches, vices etc.
A good solid/heavy Bench is really helpful when planing tops and backs, but a "workmate" collapsible type I found adequate for pretty much everything else.
A kitchen table is especially useful as well!


Do I need to attend Classes?
This will depend to a great extent on an individual's personal situation and preferences ...
There are a great many reference sources out there including countless videos, and the Bob Benedetto manual.
That said courses may be the way to go for many people ...
Factors to consider include :-
-
Skill Set:
-
are you able to confidently/safely use the tools needed?
-
-
Motivation:
-
will you "stick with it" - for a year or two?
-
-
Access to tools, benches etc
I was lucky enough to live near an excellent luthier/teacher (see Credits), and attended once weekly classes in term time for 2 years.
For me the best balance was to go to the class for guidance, advice and "homework.
On balance, I think I completed about 3/4s of the work at home.


Design; Key Elements
It was important to me to create something of my own - rather than directly copy somebody else's achievement.
I sought throughout to incorporate features of my own and these may be found in nearly all elements of the finished article ...
I have illustrated these in the following pages ...

Aesthetic
My intention was create an instrument with the appearance of a vintage cello or bass.
There are intentional asymmetries occasionally and the appearance of the effects of age and use.
I believe the Japanese concept is "Wabi Sabi"?
I do feel though that there is a major difference between seeking "perfect imperfection" and accepting errors through a "that'll do" approach ! :-)

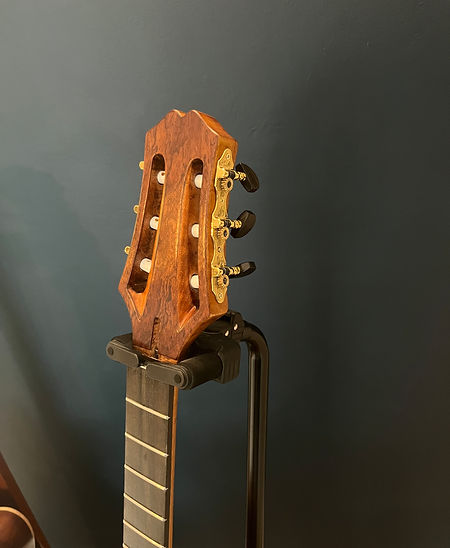
Headstock and Tuning Machines
The slotted headstock design took a great deal of time and experiment.
The sides need to be curved enough to be elegant, but but not so curved that "3 on a plate" classical tuners could not be installed.
The classical tuners and slotted stock are key in that they allow for the use of either steel or nylon strings ...

Pick Ups and Transducers
So why the slotted headstock and the earlier mention of steel or nylon string choice?
Ths guitar has both internal transducers AND a magnetic floating pick up! :-)
These can be operated separately or together.
In principle then, it will be possible to use nylon strings if the mood takes.
It's only been completed a couple of weeks and I haven't tested the sound with nylon strings.
I can say though that the sound with either pick-up is excellent - and that the sound of them both together is incredible! :-)
The instrument is Baritone, tuned BEADF*B and sounds beautiful.
I love baritone tuning on archtops and all of the ones I own are tuned to this pitch...

Neck and Volute
We return to the neck later in the "Mistakes, Disasters and Near Misses section"!
I prefer to have position markers on the side of the fretboard only. I feel it is consistent with the "cello vibe"
The position markers are cut from brass rod and very discreet.
Let's just say for now that I got away with a mistake on the neck - and that I'm super pleased with the volute!

Body Shape
The body shape is unusual in that it has a very flat shoulder design.
It was surprisingly difficult to get the flat shoulder I wanted without straying into the rather pointed shoulder that results with some of the "Gypsy Jazz" guitars.
In the end, the ribs themselves settled as if taking pity on me into exactly the shape I was after!
The arches are very deep - a preference of mine, ansd extend all the way to the body edges.
There is no "recurve" on the top or back.
I dislike anything but the most subtle recurve and just "went for it"
I love the finished appearance - but see the next section on "Binding"!

Binding
On this build, I decided that if I were to have binding at all, it would be very dark or match the top and ribs.
This I felt was the "cello" look I was after.
I have no experience with routers - and my distrust of the things was heightened by an incident I witnessed in the workshop! :-)
I was pleased then as it became clear that binding was really not a practical option this time round.
This was due to the combination of very deep arches and no recurve on which to locate the router guide!
I hadn't foreseen this.
I did however create the very convincing appearance of bindiing by scribing around the guitar edges before staining.
The stain entering the scribe darkens and is indistinguishable from binding! :-)
I should say though that for this to work, the joint between top, back and sides have to be pretty tight as they are there for the world to see!
Of course some say that a primary purpose of binding is to hide any such "irregularities" - surely not ! ??? :-)

Body Materials
The maple top and spruce back are a deliberate experiment.
I hope that the maple top being stiff and strong would allow me to go thinner than usual; especially coupled with the integral carved bracing.
I hoped that a thinner top would equaly a more responsive top.
I know that there are many who disagree that this is necessarily the case!
I reasoned that the instrument's sound is created by vibration within the body cavity being projected through the f-holes - rather than the sound being created by the vibrating top.
It followed then that spruce would play as effective a role on the back as it normally does on the front!
In the end all I can say for certain is that it is indeed a very light, " lively" and responsive instrument.
Exactly why ?
I don't know but I'm relieved!
Top Bracing
The top bracing is carved into the top - rather than glued on.
I reasoned that this would be stronger, less of a barrier to vibration, and allow me to make it "thinner and taller'.
TBH the idea appealed to me and I loved the look - although nobody else will ever see it! :-)

From "Thunk" to "Donk"
(Tap-tuning)
Despite a great deal of time spent "tap tuning" and watching others do it, I am afraid it is still for me a journey from "thunk to donk".
Some highly esteemd and experienced builders claim it's all about "experience" - well they would say that wouldn't they! :-)
I can certainly attest that the sustain of the "donk" improves as the top is carved.
Beyond that, Doctor Johnson's cucumbers come to mind ....
:-)

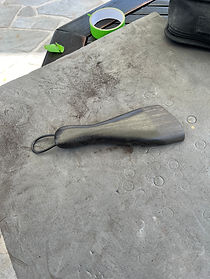
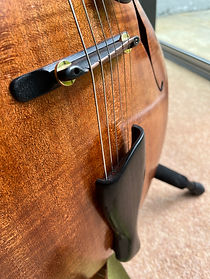
Tailpiece
The tailpiece is a "lanyard" style item carved from a single piece of ebony.
The strings are recessed beneath a "shelf" purely because I ike the appearance.
The tailpiece is an example of the intentional asymettry I mentioned earlier.
The strings are grounded one to another by a brass rod passing through the ball ends. This does make changing individual strings a bit of a faff - but I generally change them as a set in any case and have found the same issue with similar designs.


Thanks and Credits
I'd like to acknowledge the support, guidance and patience of :-
Mike Hobbs - Expert Luthier; who takes the weekly guitar classes I attended.
Graham Esson, Arthur Aubert and Andrew Lines at
Fibonacci Guitars.
John Dickinson for his expertise wth the transducers and pick-ups.
Nigel Price - jazz guitar legend - for having taken the time to make of recording of the instrument for me!
Ciyo Brown - jazz guitar maestro for his enthusiams and support!
